> ## Documentation Index
> Fetch the complete documentation index at: https://docs-dev-fix-docs-5525.mintlify.site/llms.txt
> Use this file to discover all available pages before exploring further.
> Auth0 Configuration for the Mobile + API architecture scenario
# Auth0 Configuration (Mobile Apps + API)
In this section we will review all the configurations we need to apply at the [Auth0 Dashboard](https://manage.auth0.com/#).
## Create the API
Click on the [APIs menu option](https://manage.auth0.com/#/apis) on the left, and click the Create API button.
You will be required to supply the following details for your API:
* **Name**: a friendly name for the API. Does not affect any functionality.
* **Identifier**: a unique identifier for the API. We recommend using a URL but note that this doesn't have to be a publicly available URL, Auth0 will not call your API at all. This value cannot be modified afterwards.
* **Signing Algorithm**: the algorithm to sign the tokens with. The available values are `HS256` and `RS256`. When selecting RS256 the token will be signed with the tenant's private key. To learn more about signing algorithms, see [Signing Algorithms](/docs/get-started/applications/signing-algorithms).
 Fill in the required information and click the **Create** button.
#### Signing Algorithms
When you create an API you have to select the algorithm your tokens will be signed with. The signature is used to verify that the sender of the JWT is who it says it is and to ensure that the message wasn't changed along the way.
The signature is part of a JWT. If you are unfamiliar with JWT structure, please see [JSON Web Token Structure](/docs/secure/tokens/json-web-tokens/json-web-token-structure).
To create the signature part you have to take the encoded header, the encoded payload, a secret, the algorithm specified in the header, and sign that. That algorithm, which is part of the JWT header, is the one you select for your API: `HS256` or `RS256`.
* **RS256** is an [asymmetric algorithm](https://en.wikipedia.org/wiki/Public-key_cryptography) which means that there are two keys: one public and one private (secret). Auth0 has the secret key, which is used to generate the signature, and the consumer of the JWT has the public key, which is used to validate the signature.
* **HS256** is a [symmetric algorithm](https://en.wikipedia.org/wiki/Symmetric-key_algorithm) which means that there is only one secret key, shared between the two parties. The same key is used both to generate the signature and to validate it. Special care should be taken in order for the key to remain confidential.
The most secure practice, and our recommendation, is to use **RS256**. Some of the reasons are:
* With RS256 you are sure that only the holder of the private key (Auth0) can sign tokens, while anyone can check if the token is valid using the public key.
* Under HS256, If the private key is compromised you would have to re-deploy the API with the new secret. With RS256 you can request a token that is valid for multiple audiences.
* With RS256 you can implement key rotation without having to re-deploy the API with the new secret.
For a more detailed overview of the JWT signing algorithms refer to: [JSON Web Token (JWT) Signing Algorithms Overview](https://auth0.com/blog/json-web-token-signing-algorithms-overview/).
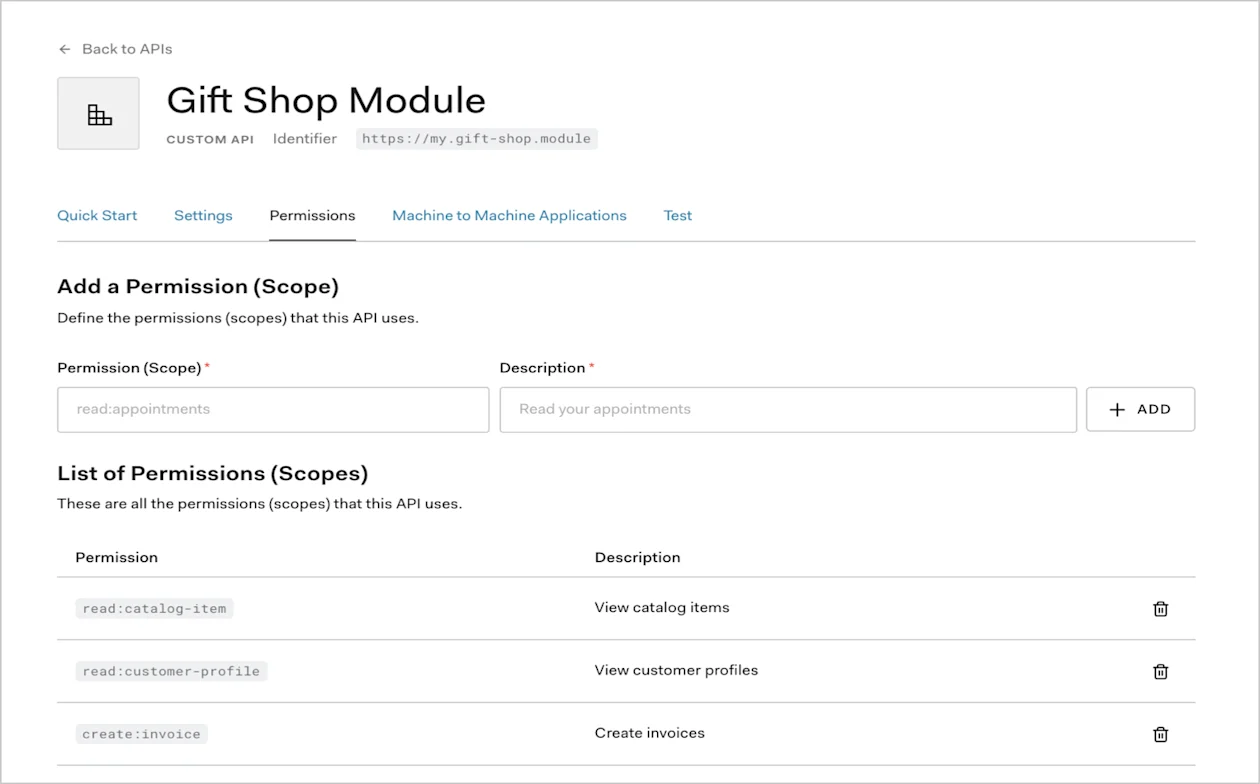
### Configure the Permissions
Once the application has been created you will need to configure the Permissions which applications can request during authorization.
In the settings for your API, go to the **Permissions** tab. In this section you can add all four of the scopes which were discussed before, namely `read:timesheets`, `create:timesheets`, `delete:timesheets`, `approve:timesheets`.
Fill in the required information and click the **Create** button.
#### Signing Algorithms
When you create an API you have to select the algorithm your tokens will be signed with. The signature is used to verify that the sender of the JWT is who it says it is and to ensure that the message wasn't changed along the way.
The signature is part of a JWT. If you are unfamiliar with JWT structure, please see [JSON Web Token Structure](/docs/secure/tokens/json-web-tokens/json-web-token-structure).
To create the signature part you have to take the encoded header, the encoded payload, a secret, the algorithm specified in the header, and sign that. That algorithm, which is part of the JWT header, is the one you select for your API: `HS256` or `RS256`.
* **RS256** is an [asymmetric algorithm](https://en.wikipedia.org/wiki/Public-key_cryptography) which means that there are two keys: one public and one private (secret). Auth0 has the secret key, which is used to generate the signature, and the consumer of the JWT has the public key, which is used to validate the signature.
* **HS256** is a [symmetric algorithm](https://en.wikipedia.org/wiki/Symmetric-key_algorithm) which means that there is only one secret key, shared between the two parties. The same key is used both to generate the signature and to validate it. Special care should be taken in order for the key to remain confidential.
The most secure practice, and our recommendation, is to use **RS256**. Some of the reasons are:
* With RS256 you are sure that only the holder of the private key (Auth0) can sign tokens, while anyone can check if the token is valid using the public key.
* Under HS256, If the private key is compromised you would have to re-deploy the API with the new secret. With RS256 you can request a token that is valid for multiple audiences.
* With RS256 you can implement key rotation without having to re-deploy the API with the new secret.
For a more detailed overview of the JWT signing algorithms refer to: [JSON Web Token (JWT) Signing Algorithms Overview](https://auth0.com/blog/json-web-token-signing-algorithms-overview/).
### Configure the Permissions
Once the application has been created you will need to configure the Permissions which applications can request during authorization.
In the settings for your API, go to the **Permissions** tab. In this section you can add all four of the scopes which were discussed before, namely `read:timesheets`, `create:timesheets`, `delete:timesheets`, `approve:timesheets`.
 ## Create the Application
There are four application types in Auth0: **Native App** (used by mobile or desktop apps), **Single-Page Web App**, **Regular Web App**, and **Machine to Machine App** (used by CLIs, Daemons, or services running on your backend). For this scenario we want to create a new Application for our mobile application, hence we will use Native as the application type.
To create a new Application, navigate to the [dashboard](https://manage.auth0.com/#) and click on the [Applications](https://manage.auth0.com/#/applications) menu option on the left. Click the **+ Create Application** button.
Set a name for your Application (we will use `Timesheets Mobile`) and select `Native App` as the type.
Click **Create**.
## Configure the Authorization Extension
You will need to ensure that the Authorization Extension is installed for your tenant. You can refer to the [Authorization Extension documentation](/docs/customize/extensions/authorization-extension) for details on how to do this.
### Define Permissions
You will need to define Permissions which correlates with the scopes you have already defined. In the Authorization Extension, click the Permissions tab, and then click on the **Create Permission** button. In the dialog, capture the details for each permission. Ensure that the name of the permission is exactly the same as the corresponding scope:
Proceed to create the permissions for all the remaining scopes:
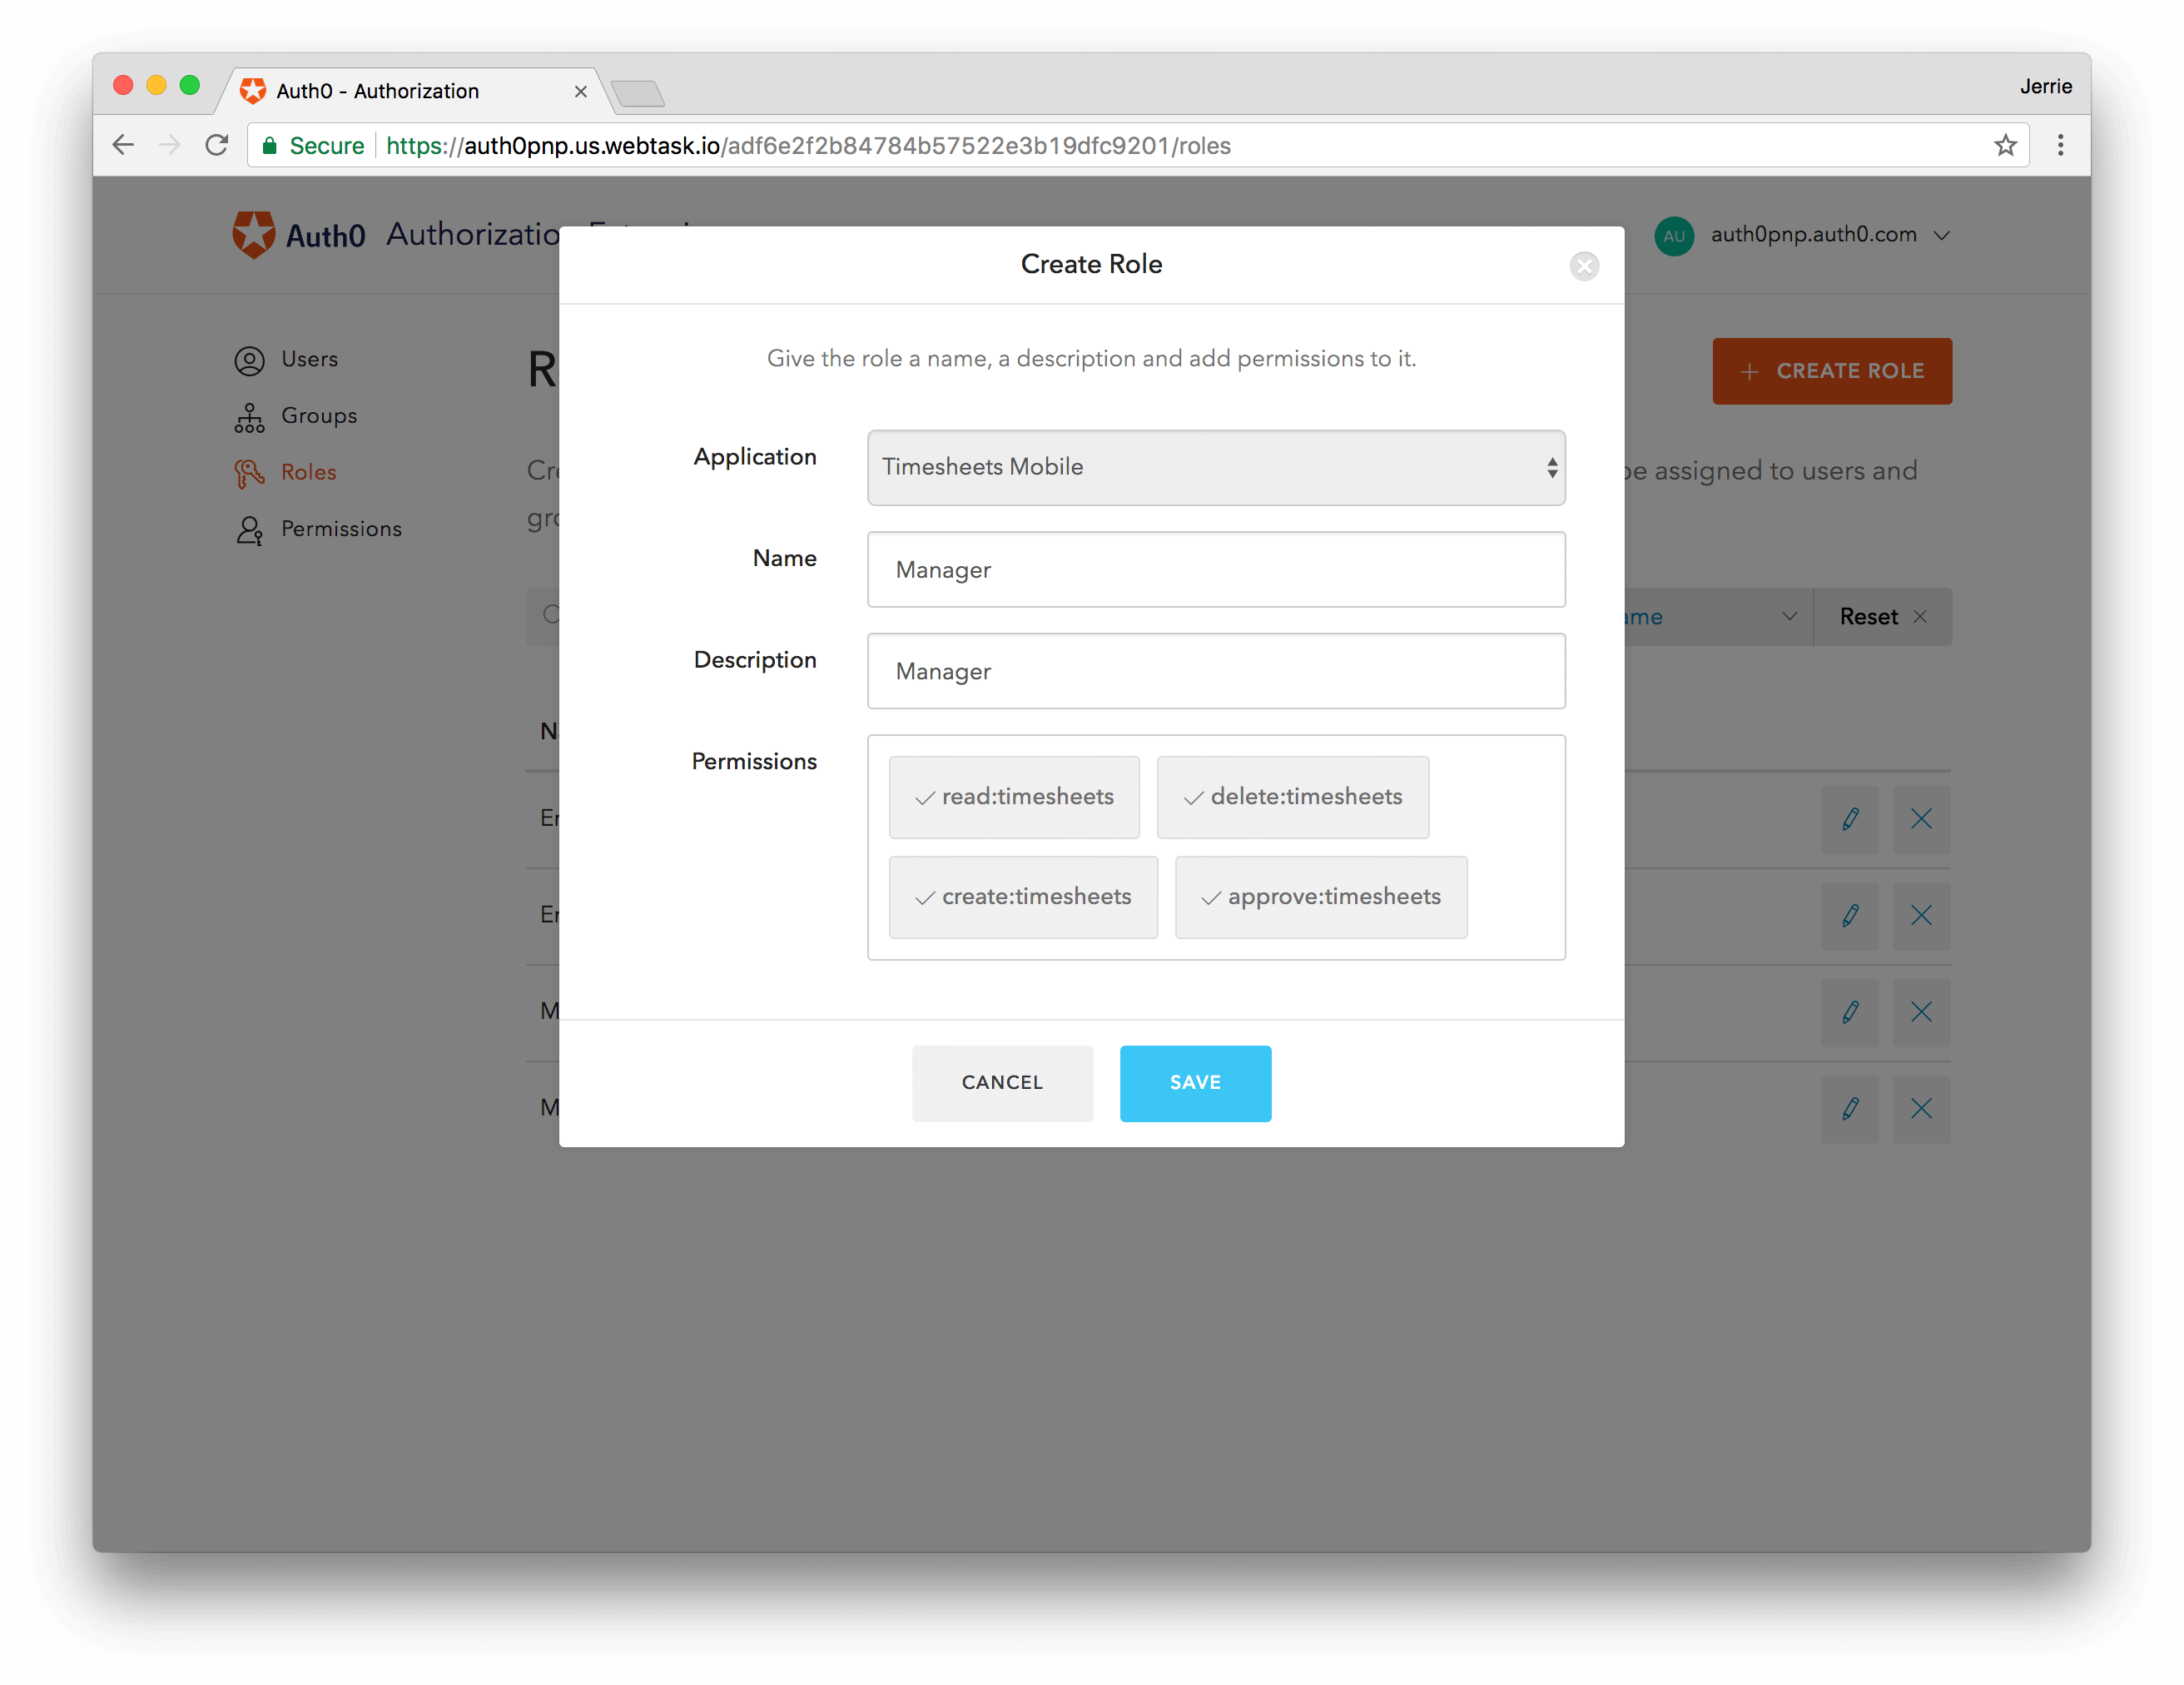
### Define Roles
Head over to the Roles tab and create two Roles. Click the **Create Role** button and select the **Timesheets SPA** application. Give the Role a name and description of Employee, and select the `delete:timesheets`, `create:timesheets` and `read:timesheets` permissions. Click on **Save**.
Next, follow the same process to create a **Manager** role, and ensure that you have selected all the permissions:
## Create the Application
There are four application types in Auth0: **Native App** (used by mobile or desktop apps), **Single-Page Web App**, **Regular Web App**, and **Machine to Machine App** (used by CLIs, Daemons, or services running on your backend). For this scenario we want to create a new Application for our mobile application, hence we will use Native as the application type.
To create a new Application, navigate to the [dashboard](https://manage.auth0.com/#) and click on the [Applications](https://manage.auth0.com/#/applications) menu option on the left. Click the **+ Create Application** button.
Set a name for your Application (we will use `Timesheets Mobile`) and select `Native App` as the type.
Click **Create**.
## Configure the Authorization Extension
You will need to ensure that the Authorization Extension is installed for your tenant. You can refer to the [Authorization Extension documentation](/docs/customize/extensions/authorization-extension) for details on how to do this.
### Define Permissions
You will need to define Permissions which correlates with the scopes you have already defined. In the Authorization Extension, click the Permissions tab, and then click on the **Create Permission** button. In the dialog, capture the details for each permission. Ensure that the name of the permission is exactly the same as the corresponding scope:
Proceed to create the permissions for all the remaining scopes:
### Define Roles
Head over to the Roles tab and create two Roles. Click the **Create Role** button and select the **Timesheets SPA** application. Give the Role a name and description of Employee, and select the `delete:timesheets`, `create:timesheets` and `read:timesheets` permissions. Click on **Save**.
Next, follow the same process to create a **Manager** role, and ensure that you have selected all the permissions:
 ### Assign Users to Roles
You will need to assign all users to either the Manager or the User role. You can do this by going to the Users tab in the Authorization Extension and selecting a user. On the user information screen, go to the Roles tab. You can add a role to the user by clicking the **Add Role to User** button, and selecting the appropriate role for the user.
### Configuring the Authorization Extension
You will also need to ensure that the Rule for the Authorization Extension is published. You can do this by clicking on your user avatar in to top right of the Authorization Extension, and selecting the **Configuration** option:
Ensure that you have enabled **Permissions** and then click the **Publish Rule** button.
### Create a Rule to validate token scopes
The final step in this process is to create a Rule which will validate that the scopes contained in an Access Token is valid based on the permissions assigned to the user. Any scopes which are not valid for a user should be removed from the Access Token.
In your Auth0 Dashboard, go to the Rules tab. You should see the Rule created by the Authorization Extension.
Click on the **Create Rule** button and select the **Empty Rule** template. You can give the Rule a name, such as **Access Token Scopes**, and then specify the following code for the Rule:
```javascript lines theme={null}
function (user, context, callback) {
if (context.clientName !== 'Timesheets SPA') {
return callback(null, user, context);
}
var permissions = user.permissions || [];
var requestedScopes = context.request.body.scope || context.request.query.scope;
var filteredScopes = requestedScopes.split(' ').filter( function(x) {
return x.indexOf(':') < 0;
});
Array.prototype.push.apply(filteredScopes, permissions);
context.accessToken.scope = filteredScopes.join(' ');
callback(null, user, context);
}
```
The code above will ensure that all Access Tokens will only contain the properly-formatted scopes (e.g., `action:area` or `delete:timesheets`) which are valid according to a user's permissions. Once you are done you can click on the **Save** button.
Rules execute in the order they are displayed on the Rules page, so ensure that the new rule you created is positioned below the rule for the Authorization Extension, so it executes after the Authorization Extension rule.
PREVIOUS TUTORIAL [1. Solution Overview](/docs/get-started/architecture-scenarios/mobile-api/part-1)
NEXT TUTORIAL [3. API + Mobile Implementation](/docs/get-started/architecture-scenarios/mobile-api/api-implementation-nodejs)
### Assign Users to Roles
You will need to assign all users to either the Manager or the User role. You can do this by going to the Users tab in the Authorization Extension and selecting a user. On the user information screen, go to the Roles tab. You can add a role to the user by clicking the **Add Role to User** button, and selecting the appropriate role for the user.
### Configuring the Authorization Extension
You will also need to ensure that the Rule for the Authorization Extension is published. You can do this by clicking on your user avatar in to top right of the Authorization Extension, and selecting the **Configuration** option:
Ensure that you have enabled **Permissions** and then click the **Publish Rule** button.
### Create a Rule to validate token scopes
The final step in this process is to create a Rule which will validate that the scopes contained in an Access Token is valid based on the permissions assigned to the user. Any scopes which are not valid for a user should be removed from the Access Token.
In your Auth0 Dashboard, go to the Rules tab. You should see the Rule created by the Authorization Extension.
Click on the **Create Rule** button and select the **Empty Rule** template. You can give the Rule a name, such as **Access Token Scopes**, and then specify the following code for the Rule:
```javascript lines theme={null}
function (user, context, callback) {
if (context.clientName !== 'Timesheets SPA') {
return callback(null, user, context);
}
var permissions = user.permissions || [];
var requestedScopes = context.request.body.scope || context.request.query.scope;
var filteredScopes = requestedScopes.split(' ').filter( function(x) {
return x.indexOf(':') < 0;
});
Array.prototype.push.apply(filteredScopes, permissions);
context.accessToken.scope = filteredScopes.join(' ');
callback(null, user, context);
}
```
The code above will ensure that all Access Tokens will only contain the properly-formatted scopes (e.g., `action:area` or `delete:timesheets`) which are valid according to a user's permissions. Once you are done you can click on the **Save** button.
Rules execute in the order they are displayed on the Rules page, so ensure that the new rule you created is positioned below the rule for the Authorization Extension, so it executes after the Authorization Extension rule.
PREVIOUS TUTORIAL [1. Solution Overview](/docs/get-started/architecture-scenarios/mobile-api/part-1)
NEXT TUTORIAL [3. API + Mobile Implementation](/docs/get-started/architecture-scenarios/mobile-api/api-implementation-nodejs)